If you run a store, you probably know that having a website is a must, even if your most profitable activity is offline sales. Online stores are everywhere, and if you want to offer your customers a multi-channel experience, you must invest in one.E-commerce stores are an excellent way to get online business, but they can also transform online traffic into in-person sales using maps directly on the website.If you host your store on Shopify, you can use Google's mapping service to add your location information for your customers. Learn how to add a Google Map to Shopify in just a few minutes by embedding this solution, using API, or incorporating a store locator tool like Storemapper.
Add a Google Map to your Shopify store in minutes.
Start your free, no-risk, 7-day trial today
No credit card required
3 Ways to Add Google Maps to Shopify
Adding a Google Map to your e-commerce site on Shopify is as simple as it sounds, and you can do it in three different ways.
Option 1: Using a Store Locator App
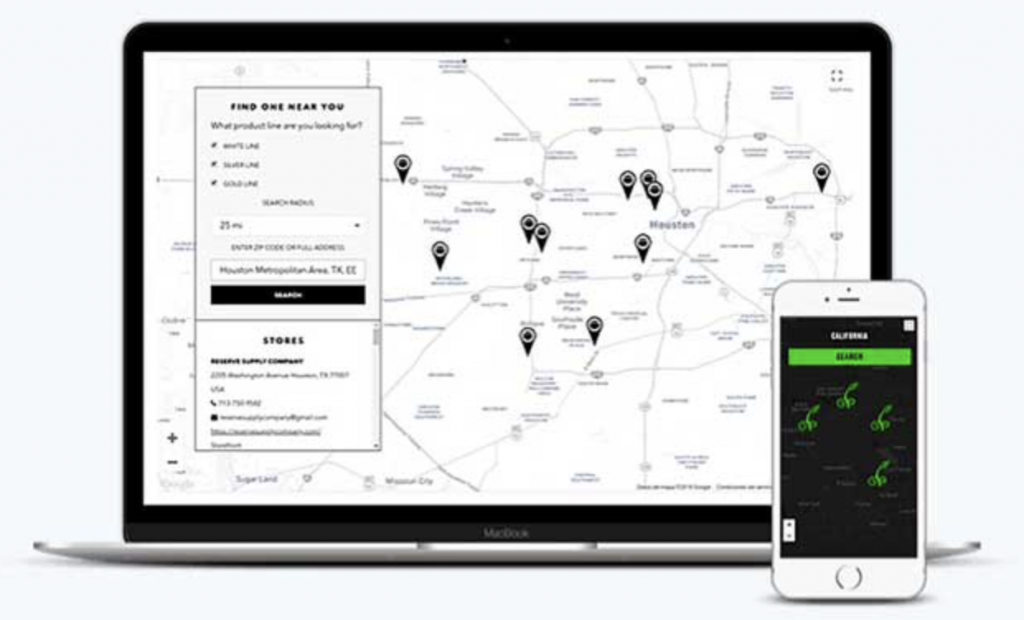
A store locator app is a tool that allows you to easily add map interfaces or information to any website. It helps customers find the exact location of a store using their computer or mobile phone.

With a simple internet search, you’ll find many different store locator tools that use Google Maps as their mapping solution. Though they all have pros and cons, Storemapper is the favorite option for stores like Elegance, Silver Lining, and Gera Dovana.Storemapper is a great store locator solution because it:
- Is easy to install
- Doesn't require you to have coding skills
- Allows you to add stores and edit your map whenever you need to
- Has a tremendous analytic and store performance monitor tool
- Can customize your map according to your brand's style
- Has excellent customer support always available to help
- Has a seven-day free trial for you to test all of its incredible features
Add Google Maps to Shopify.
Start your free, no-risk, 7-day trial today
No credit card required
Option 2: Using an Embedded Google Map

Google Maps offers the possibility of embedding a map view to your website, and you can add this solution to your Shopify store. Here is the step-by-step on how to do it:
- Go to Google Maps and log in to your Google account.
- Search for your physical store location on the map.
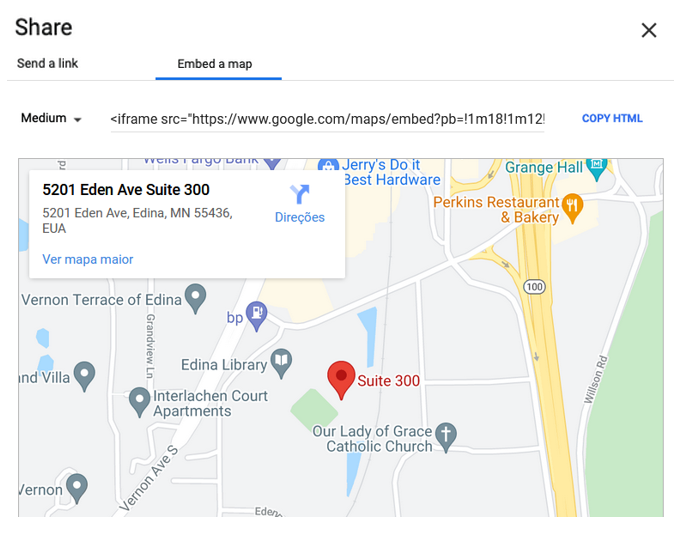
- Activate the "Share" button. A box with sharing options will open.
- Select the option "embed a map".
- Choose the size of your mapping view and copy the code.
- Go to your Shopify store and open the HTML of the page you want to add the map.
- Paste the code you just copied into the HTML.
- Save and reload your page to see if it uploaded correctly.
Option 3: Using a Google Maps API Key
The last option to add a Google Map to your Shopify store is by using an API key from this Google service. Note that this may be a more complex way to add a mapping solution to your site if you don't have any coding experience.

Steps to Get Your API Key
- Access Google Maps Platform and select "Get Started".
- Choose the API that works with the free themes map section (Maps, Routes, and Places products).
- Select "Continue".
- Create a name for your project or select an existing one.
- Agree to the terms and conditions and choose "Next".
- Create a billing account.
- Enable your account, then copy your Google Maps API to your clipboard.
Steps to Add the API to Shopify
- Go to your Shopify Admin dashboard, select "Online Stores," and then "Themes".
- Search for your page's theme and choose "Customize".
- Select "Add section".
- Choose "Map" and select one.
- Enter all the information for your map.
- Paste your Google Maps API key to the according field.
- Hit “Save”.
Why Should I Add a Google Map to My Shopify Store?
There are some excellent reasons for you to add a Google Map to your Shopify Store, a few being:
Transforms your online visitors into in-store conversions
Having a map on your store's website is a game-changer for your foot traffic. Since most consumers start to research a product online, there is a bigger chance that they will find your site, identify your physical store location, and make the trip to shop at your store if they are not interested in buying online.
Improves your page's SEO
Search engine optimization, or SEO, is a group of techniques that marketers use to make online pages more visible online. And even though you’re not a digital marketer, your website can benefit from a few simple, easy to apply SEO techniques — one of them is to add a map to your e-commerce store.Google uses ranking factors to make your site visible to users, and one of those factors is the time spent on-site. Having a map on your store can make your visitors spend more time interacting with your pages, which will boost your SEO.
Makes it easier to find your products or services
Google is the most common starting point for any kind of research, so it’s critical to ensure you have a virtual presence there. If your potential customers don't see your products and services on Google, there is a chance they'll think your business doesn't exist. Not only will a website make your store more reliable, but a map showing your exact location can be the ultimate proof your clients need to pay you an in-person visit.
Finalizes what was a potential sale
Although many customers start their shopping journey online, most still don't feel secure enough to complete a purchase within a virtual store. An excellent way to still make these potential sales happen is by offering visitors the possibility to shop in person with the help of a good store locator, like Storemapper. When your potential customers can easily find you through a map, you increase your chances of guaranteeing sales from them.
How to Add a Google Map to Shopify With Storemapper
With Storemapper, it only takes about a minute to add a store locator to your Shopify store. Take a look at this step-by-step guide on how to do it.
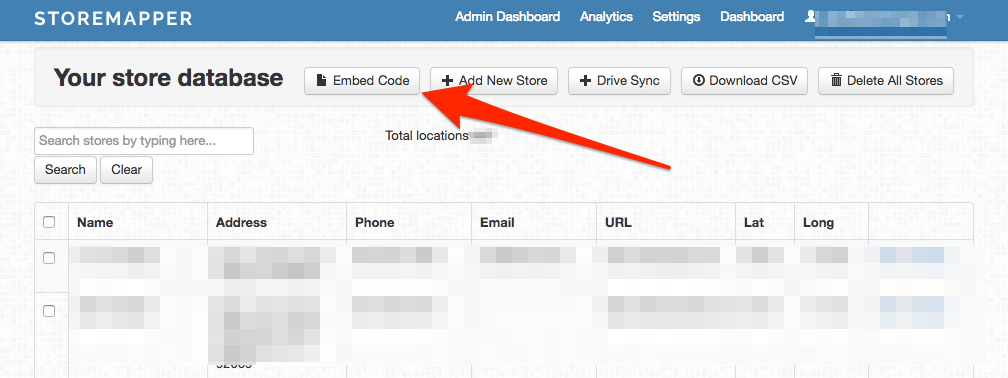
- Get your Storemapper embed code here or by accessing your user dashboard.

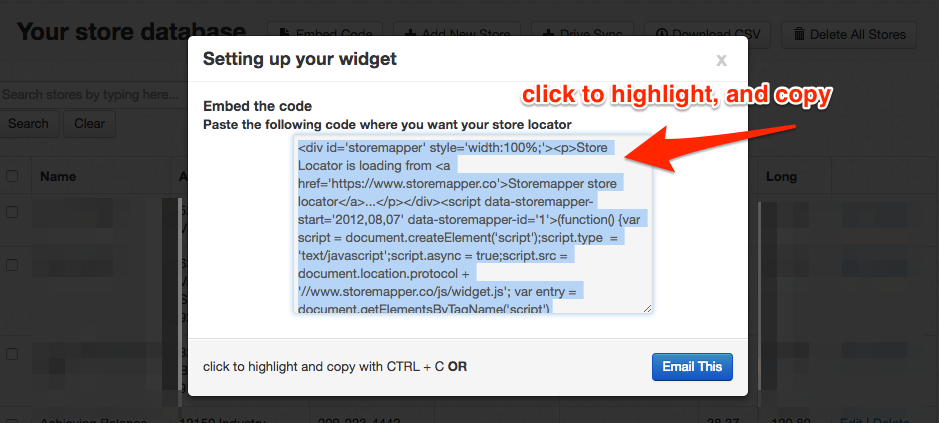
2. Copy the code to your clipboard.

3. Log in to your Shopify account.4. On the admin dashboard, access "Online Store" and then "Pages". 5. Create a new page or find an existing one to where you want to add the map.6. Name it "store locator” or "find us", or some other way to identify the map section.7. On the page in the editor, select "<>" to access HTML mode.8. Paste the copied code to the content field.

9. Save page changes, and you’re ready to go.If you installed the Storemapper solution from the Shopify app store, you don't need to follow this guide. The embedded mapping solution will be automatically created on your store after you complete the installation!As you can see, adding a Google map to your Shopify store is quick and easy using Storemapper. You don't need any coding skills to do it, and it gives your website a more professional and complete design and user experience. How about trying it now?Start your 7-day free trial today, and enjoy all of Storemapper's features.


