

If you start to get the cold sweats any time you have to install a new app on your website, have no fear! We wrote this straightforward guide to walk you through the three step process for installing Storemapper, so you can get up and running without hassle. Plus, we hired someone without any coding skills to write it, so they’d make sure it could be easily understood by non-coders.

Our writer’s response when we showed them some HTML[/caption]We also compiled the most common errors that come up while installing Storemapper, so you can jump over those hurdles with ease. By the end of this article, your Storemapper application should be active on your site without a problem. And if you’re already feeling overwhelmed, that’s ok! Just take a deep breath—you got this![caption id="attachment_35005" align="aligncenter" width="300"]

He believes in you, and he’s very wise
- Step 1: Install the Store Code
- Step 2: Add Your Stores
- Step 3: Generate Your API Key/Token
- Check Your Work - Free Checklist
- Conclusion
Step 1: Install the Store Locator Code
Storemapper can be added on all CMS platforms. Once you add the Storemapper app, you’ll be taken to your Onboarding page. There, the first step we advise you to do is Install the Store Locator Code.[box type="bio"] QUICK TIP: If you’ve installed Storemapper from the Shopify App store, you don’t need to do Step 1, as it’s already done for you. That’s because when you install through the Shopify app store, we automatically create a page with your embedded code. So you can skip to Step 2 if that’s you. [/box]Otherwise, do these three tasks to complete Step 1:
1. Grab the Embed Code
[caption id="attachment_35030" align="aligncenter" width="462"]
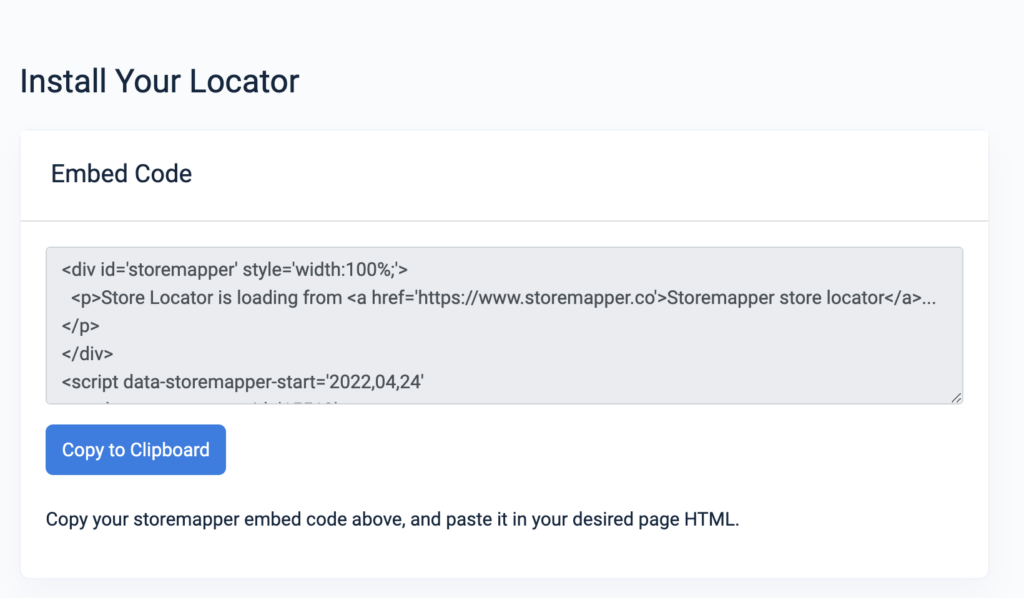
Embed code to install your store locator[/caption]Click the Install the store locator button, and you’ll be taken to a page where you can copy the code for your Storemapper map. This code is unique to your account. It can be added to the back end of any website that uses HTML (Wix, Squarespace, Shopify, BigCommerce, etc.).Hit copy to clipboard and head to the next step.
2. Add Your Map Code on the Back End
In your Shopify Admin, go to Online Store and then to Pages. Create a new page or find an existing page where you want your map to display. Then, enable HTML by clicking on “<>” and paste your code.[caption id="attachment_35022" align="aligncenter" width="461"]
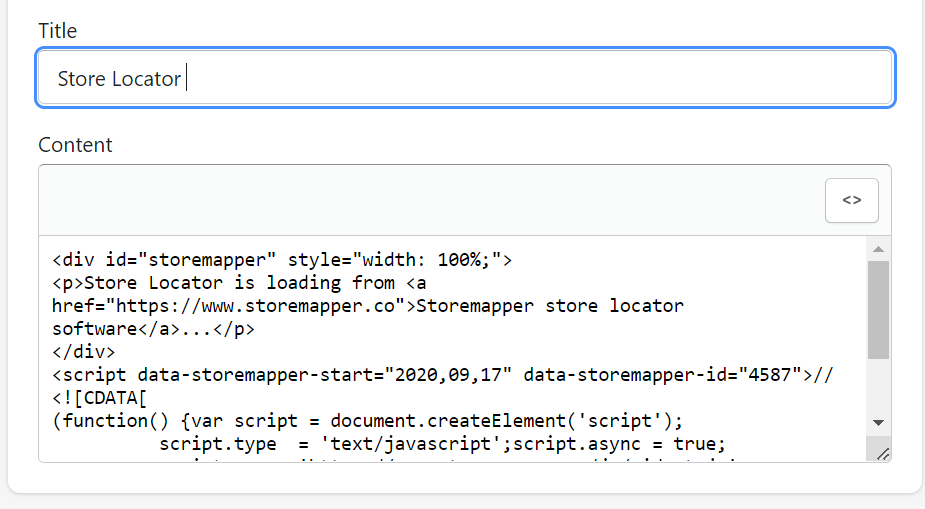
Before you hit "<>" a second time[/caption]After you've pasted the code, re-press “<>” and the code will show as "Store locator is loading from"[caption id="attachment_35023" align="aligncenter" width="459"]
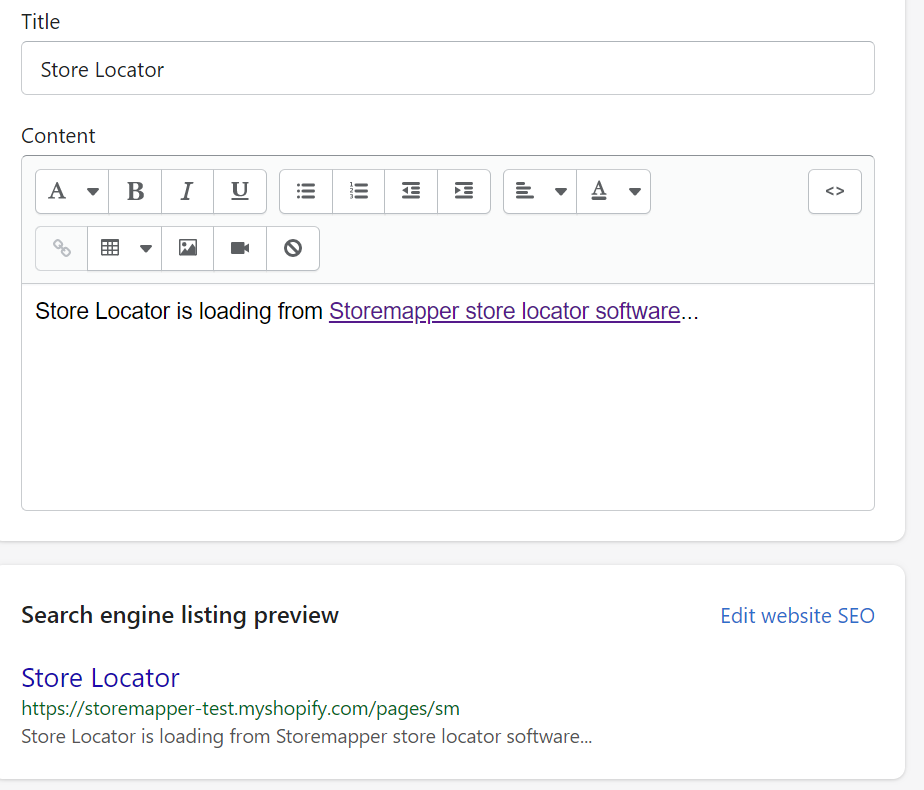
It should look like this after you hit "<>" a second time[/caption]
3. Hit save and you’re good to go
Congrats! This golden retriever is proud of you. On to Step 2![caption id="attachment_35024" align="aligncenter" width="514"]

Clearly a good boy[/caption][box type="bio"] QUICK TIP: If you want more detail on Step 1, here are some additional help articles for you:Install Storemapper to Shopify StoreInstructions for Installing Storemapper on Any Site [/box]
Increase your WordPress store's visibility with Storemapper
Start your free, no-risk, 7-day trial today
No credit card required
Step 2: Add Your Stores
There are two ways to add your stores: Manually or In Bulk through CSV. Your CSV will either be a downloaded document from our site, or for those with the Premium plan, you can use Google Drive, which will open your .CSV file right in your browser.
How to Add Stores Manually
1. Navigate to the Store Section

On the left side menu of your onboarding page, click the Stores dropdown and then click All Stores. Then, on the right hand side of the new page, click the blue button that says Add Store.
2. Type in Basic Store Information

Once you click the Add Store button, you’ll see a page that asks for your store location’s information. However, the ONLY TWO fields that are required here are Store Name and Store Address. We still recommend you fill out the rest of the information. But if you want to get things up quickly, you only need those two.Note: For a breakdown of how to utilize each section of the location form, head to this article for the full details.
3. Save Your Work
Click Save Store and the new location should appear. If not, just refresh the page (CTRL SHIFT + R), and it’ll be added.[box type="bio"] QUICK TIP: The number of stores you can upload is based on your subscription plan.
- Micro Plan - 500 Stores
- Pro Plan - 1000 Stores
- Premium Plan - 10,000 Stores
- Corporate Plan - Unlimited Stores[/box]
How to Add Stores in Bulk
If you’re on a paid plan, you can upload stores in bulk. There are a few rules about uploading through CSV that you must follow or your map won’t work. We’ll highlight those in this section, so please read carefully.
1. Download CSV spreadsheet file from Storemapper
Navigate to the Stores button on the left hand side and click Download CSV. Once downloaded, your CSV should open on a separate file on your computer.For Premium Plan users or higher: You will have a Drive Sync button instead of a Bulk Upload button. Once you press that button, it will take you to a new page, where you can toggle on the Use Google Drive Synchronization setting. Then, create your spreadsheet by pressing Open Spreadsheet and filling out your information from there, the same as below.
2. Fill out information on the spreadsheet
[box type="warning"] IMPORTANT: We recommend that you do not remove, delete, or edit any of the writing in the Row 1 cells, as it may cause issues with your spreadsheet properly connecting to Storemapper.[/box]Once you’ve downloaded the spreadsheet document (or opened in Google Drive), you can fill in your store details: name, address, phone, email, url, etc.You will also see columns for Latitude, Longitude, and Storemapper ID. Don’t worry about filling those out. It gets done automatically by the Storemapper application upon re-importing it back in your account. Those numbers are based on the addresses you put in the spreadsheet.3. Re-upload CSV file into your Storemapper accountWhen you’re finished filling out your store information in the spreadsheet, make sure to save as a .CSV file to re-upload it back into your account. Then navigate back to your account, and press the button on the left-hand side that says Bulk Upload. You’ll be taken to the page where you can re-upload your .CSV file. Presto!For Premium Plan users or higher: Under the Drive Sync page, You can press the manual sync button to only sync when you choose, or you can auto-sync your google sheets store spreadsheet to automatically re-sync the information every 24 hours. Additionally, with the Google Drive Sync, you can share the Google Sheets file with as many users as you want.[box type="bio"] QUICK TIP: For additional resources on adding your stores, check out the following help articles:Add a store from your dashboardAdd stores with CSV Bulk UploaderUsing the Google Drive spreadsheet sync feature[/box]
Step 3: Generate your API Key/Token
This step is the most complex of the three, so stick with us as we go through it in detail.First, you’ll need to choose your Map Provider. Storemapper works alongside two different third-party providers: Mapbox or Google Maps. The two work very similarly, and both offer a free plan with additional prices for going over quota. Additionally, Mapbox does not require any billing info, while Google does. And you only need to choose one to connect in your Storemapper settings.[box type="bio"] QUICK TIP: We generally find that 99% of our customers don’t ever need to pay for going over their search quota. For Mapbox, you’re allowed up to 50,000 map loads/searches per month before getting charged an additional $5.00 per 1,000 map loads/searches. And for Google, you get up to 28,000 map loads/searches per month before you get charged $7.00 per 1,000 searches. [/box]
Using Mapbox - Adding a Token
Here are the steps for adding your Mapbox Token in Storemapper.
1. Create a Mapbox account
Head to account.mapbox.com to create your free account. You can use any email address you want to create an account with Mapbox. It doesn’t have to be the same email used for Storemapper.
2. Get Your Token
Once your account is created, your main page will be your Dashboard. Navigate to the top menu and select the Tokens page. On this page, you will find a default public token already created that you can use for your account, or you can press Create a Token if you’d like to label it as Storemapper specific in your Mapbox account. Copy the token and head back to your Storemapper settings page. Head to the Map Provider settings page and paste it in the Mapbox access token box. Done![caption id="attachment_35011" align="aligncenter" width="566"]

This cat is feeling nervous about all this jargon, but she shouldn’t worry, because you’re doing great![/caption]
Using Google Maps - Adding an API Key
Here are the steps to attaining your Google API Key and adding it into Storemapper.
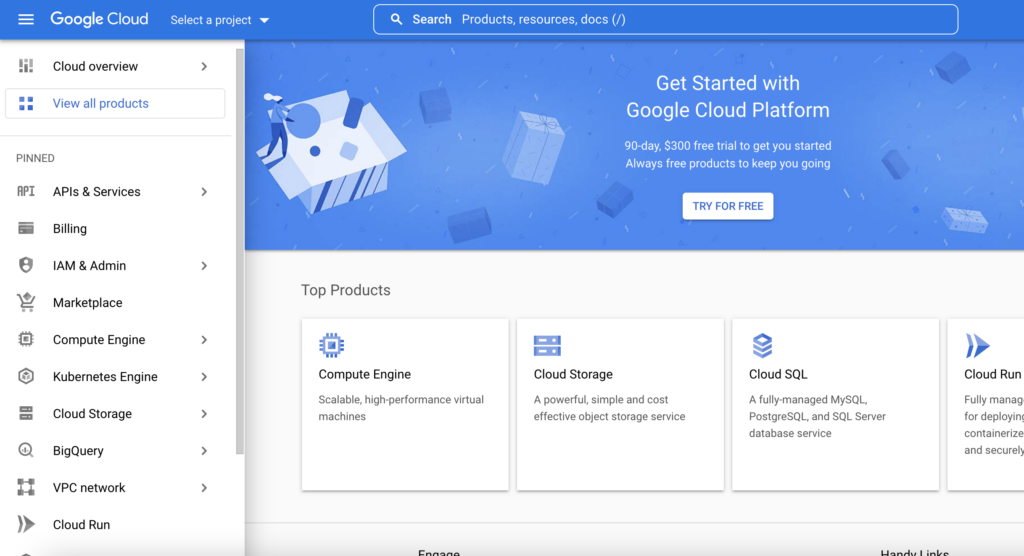
1. Create an account
Head to console.cloud.google.com to create your free account. You can use any email address you want to create an account with Google Cloud. It doesn’t have to be the same email used for Storemapper.
2. Start a new project
Click Select a project on the top left and then select New Project in the pop-up window.
3. Create Credentials

Navigate to the API Keys and Services tab on the left, and then click Credentials. Any API keys you have will be shown there. If you don’t have any yet, click Create Credentials at the top, and then click Create API Key. Once the API Key is loaded, head back to your Storemapper account and paste it into the Google Maps API Key box in the Map Provider page under Settings.Don’t stop there! There are still a few steps to go before your API Key is ready to go.
4. Enable 3 specific API Keys for your Google Account
In the left-hand API Keys menu, click Library. Once you get to the API Library, search for the following API Keys. Enable each one once found.
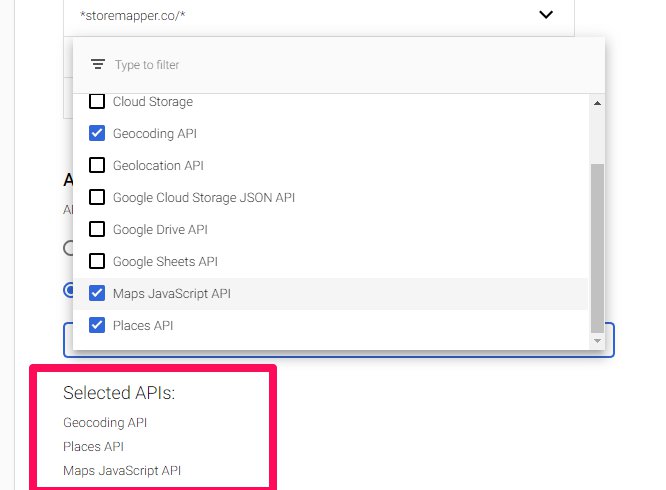
- Maps Javascript API
- Geocoding API
- Places API
When you’ve enabled these three APIs, head back to your APIs and Services menu in Google. Go to the API you just created, click the three vertical dots to the very right of it, and press Edit API Key.
5. Add API Restrictions
On the Edit API Key page, scroll down to API Restrictions, and choose the Restrict Key option. A Select APIs bar will pop up, where you can search for and check the boxes of the three you just enabled: Maps Javascript, Geocoding, and Places. Don’t forget to press Save! If everything has been set up correctly, your API Key should have a little green circle checkmark to the left of it.[box type="download"] QUICK TIP: On the same page (Edit API Key), we also recommend you use the Application Restrictions option and choose HTTP Referrers (websites). It’s not necessary, but just adds an extra layer of security. If you choose to do it, we recommend you restrict to Storemapper, your website, and your CMS platform. Once chosen, there are instructions next to the Application Restrictions section to show you how to add those websites properly.[/box]
6. Ensure that billing is set up correctly
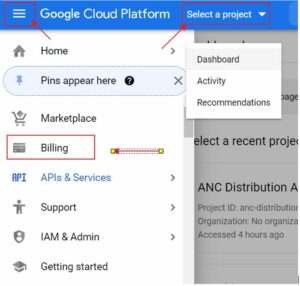
You’ll need to link your credit card to Storemapper. Head to the Billing Page to Add Billing Account. Then return to Billing>My Projects.Scroll to the three vertical dots, change the billing to your credit card, and confirm.
[box type="download"] QUICK TIP: For additional resources on adding your Mapbox Token or Google API Key, you can check out the following help articles: How to add Mapbox Token to your store locatorHow to add Google Maps API Key from Google ConsoleHow to link your billing account to Storemapper[/box]
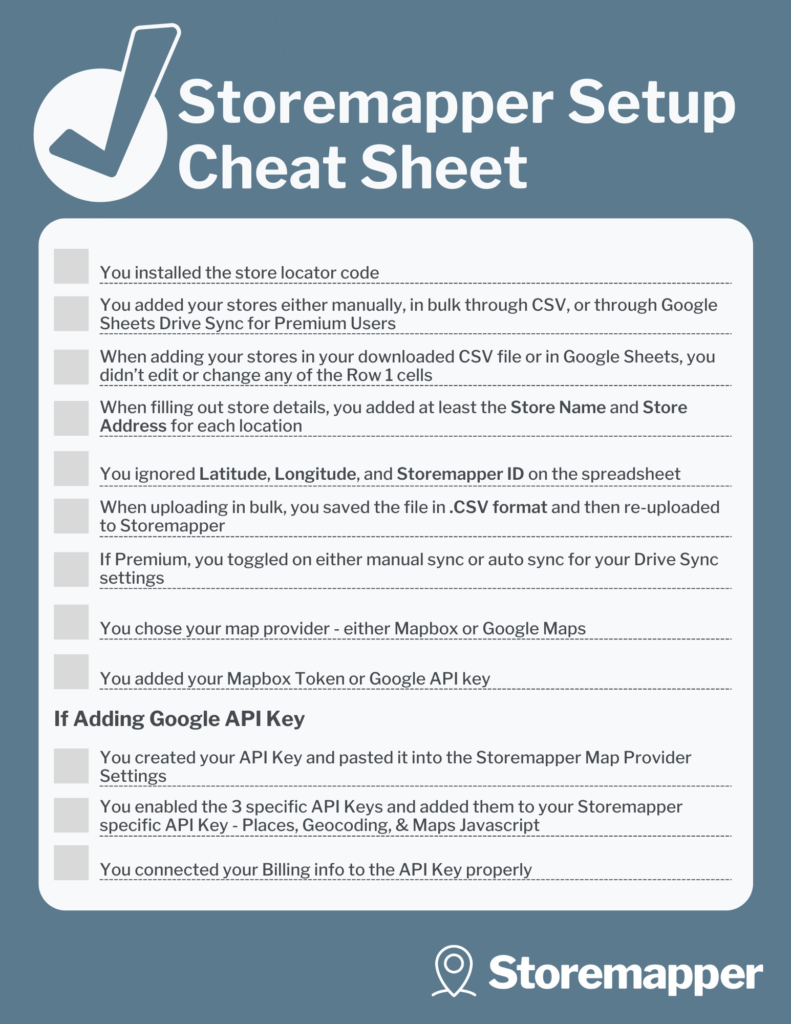
Check Your Work
Here’s a checklist for all the little issues that can crop up when installing Storemapper. Double check that you did all of these!
[caption id="attachment_35010" align="aligncenter" width="494"]

Raise the roof! You’ve made it through the full installation![/caption]
Conclusion
Congratulations! You’ve made it to the end of the instructions. Hopefully, your Storemapper map is now fully installed and working smoothly. If you find that along the way, you’ve still run into some issues and your map isn’t currently showing up on your page, don’t be alarmed. Our support team is standing by and happy to help you figure it out.Storemapper currently offers free one-on-one sessions with our support team to help you get all set up. Just reach out to us to schedule one of these at help@storemapper.co.Thanks so much for downloading Storemapper. We’re grateful that you’ve entrusted us with your store map needs, and we look forward to continuing to work with you and your business.

